Showing posts with label bread. Show all posts

Monday, November 29, 2010

Day 10: Enjoying Mom's Cooking

I conducted my daily kid-survey to see how hungry they were - a determining factor in the amount of effort I put into making dinner - and it turns out both had snacked and neither were hungry. My plans to make (and blog) about gyro sandwiches will have to wait until tomorrow. When I only have to feed myself, I usually eat from the abundance of Korean food in the bahn chahn and kim chee fridges thanks to my parents. The kids like Korean food but only periodically so when the three of us eat together, it is usually other things.

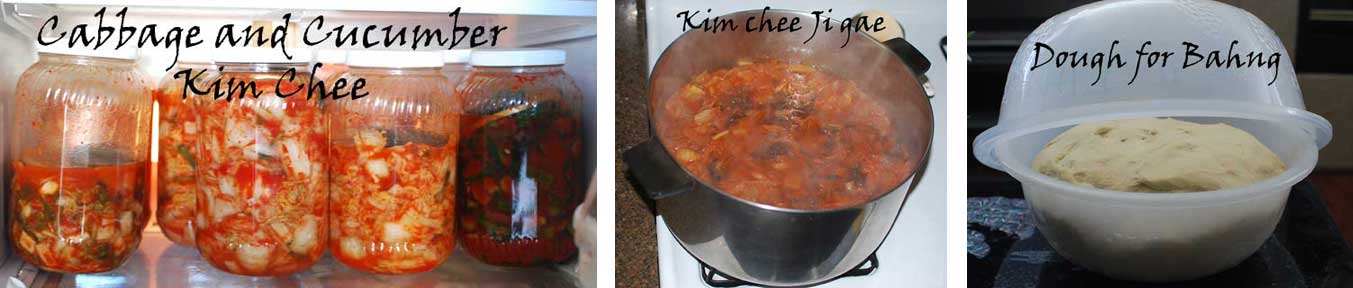
When my mother cooks, it is no small affair. Korean food, due to its high salt content, will keep for several days so when you cook, you cook A LOT and it is a major production that lasts most of the day. When my parents make their bi-weekly trek to Koreatown (about 30 minutes away), they come home with dozens of bags full of napa cabbage and Korean radishes, giant tins of soy sauce and sesame oil, plastic bins full of chili paste and soybean paste. On kim chee days, my mom makes enough kim chee to stock a small grocery store. Kim chee ji gae (soup made from kim chee) is made by the vat-ful. And dough for bahng rises in giant plastic bowls.

Speaking of bahng... Today my mother taught a friend how to make these Korean steamed rolls that are similar to Chinese dim sum. She, herself, learned how to make these rolls a couple of years ago from a friend and has since become famous (in Korean circles) for them. As I mentioned, when she makes bahng, it is in huge quantities and it takes all day; the house is filled with the tantalizing smell of yeasty, freshly steamed bread for hours. My mom makes so many of these rolls for special occasions that last year she bought a freezer chest to store them, what we now refer to as "the bahng freezer." Lucky for me, today was a bahng day.

Dinner also came from the bahn chahn fridge. Several days ago Mom made bahn chahn to take to an elderly couple (long time family friends who made it possible for our family to emigrate to the United States in 1970) and subsequently stocked our fridge with a dozen or so plastic containers of Korean stir-fried vegetables. These vegetables - usually carrots, zucchini, bean sprouts, spinach, fiddlehead fern, and cucumbers - are specifically meant to be eaten all mixed together with Korean chili paste and a fried egg, a dish called bibim bop (loosely translated means bibim = mixed and bop = rice).

This is one of my all-time favorite dishes. During my high school years I attended a boarding school that was a four hour drive from where we lived and therefore made it home usually only one weekend a month. Whenever I got home, no matter how late it was, there would be bibim bop and homemade kim chee waiting. The ultimate comfort food for a Korean child going to school far away in rural northern Michigan.

Sorry, no recipes today. You can find lots of recipes for bibim bop on the web but personally, I find it to be very labor-intensive and time-consuming and never tastes as good as when a Korean Mom makes it. However, Korean restaurants typically do a very good job, usually for under $10. BTW, if you're vegetarian, be sure to order it without the beef.

My Shopping List

Nothing - I made do with what I had on hand.

The Tally
  • The day's tally: $0
  • Total this week so far: $143

Sunday, November 21, 2010

Day 3: Enjoying the Bounties of Someone Else's Pantry

Today I was invited to join some friends for a chili dinner.  When the cook heard about my blog, he laughed and said that that was how he decided what to put in the pot. He scrounged around in his refrigerator and pantry and added the things that needed to be used up. The end result was a delicious turkey chili loaded with beans and vegetables.

My contribution to dinner was Double-Corn Cornbread, a recipe from one of my favorite cooking sites, http://www.cookscountry.com/.  

The recipe calls for 1 cup of sour cream and I was out. Since it was raining and I wasn't in the mood to go to the grocery store (what can I say, I live in Southern California!), I decided to make-do with what I could find in my fridge. I will frequently use yogurt as a substitute for sour cream in cooking but was out of that too. So I combined half a cup of mayonnaise with half a cup of cream cheese. While not quite as sour as sour cream, the texture and fat content was about equivalent and seemed to work out just fine.

To round out the meal, The Geek made bananas flambĂ©, a delicious concoction of sugar, butter, three types of alcohol, and lemon and orange zest  and juice reduced to a tangy, flavorful sauce in which bananas are then simmered. For a guy who is "not licensed to cook indoors," he knows how to finish out a meal.

Busy Mom Modifications and Tips
  • As I mentioned above, I substituted 1/2 cup Mayo + 1/2 c cream cheese for the sour cream.
  • I was running late for dinner and so I decided to take a shower while the cornbread was baking. Unfortunately, the bread over-baked in the fifteen minutes I was away. (The recipe lists 25 minutes as the baking time.) You'll definitely want to keep an eye on this the first few times you make it.
  • The cornbread turned out a bit dry and crumbly. While it could have been because I baked it too long, I suspect I also stirred it too much. Cornbread is a "quick bread" and like muffin batter, should only be mixed until the ingredients are just combined.This recipe calls for two rounds of stirring. Next time I will fold in the wet ingredients until they are just barely mixed and then swirl in (as opposed to mixing in) the melted butter.

The Results

Depending on where you live, cornbread recipes tend to be sweet or savory. This recipe falls right in the middle - just a hint of sweetness while being hearty. Dryness aside, the flavor of the cornbread was delicious. Very flavorful and "corn-y." The dry, crumbly texture worked to our advantage when we crumbled it into the chili.

Ratings
  • Crowd Comments: Everyone said the cornbread was good, that it went well with the chili
  • I rate this medium difficulty because it requires a practiced eye for determining when you have mixed enough and it is easy to over-bake. The recipe also calls for a food processor.
  • Time to prepare: 35 minutes plus 20 minutes of cooling time.
  • Prognosis: Not sure it's worth the effort; will give it one more try

My Shopping List

Nothing - I made do with what I had on hand.

The Tally

The day's tally: $0
Total this week so far: $7.77

Saturday, November 20, 2010

Day 2: Pizza and The Geek

The kids are with their dad this weekend and so I am having dinner with one of my BFFs tonight, a person I affectionately refer to as "The Geek" due to his expertise in computer programming and internet security. It's a gastronomic symbiosis - I love to cook and he loves to eat. One of our favorite meals is pizza with anchovies and since I exceeded my daily shopping limit yesterday by $2.77, I decided this was a good meal for today since I had all the ingredients in my pantry.

I recently bought the cookbook, Artisan Bread in Five Minutes A Day and I think the recipes result in some of the best bread I have ever tasted. A little flour, warm water, salt and yeast is all it takes. I always keep some dough in my refrigerator so that I can have homemade pizza (or calzone) in 20 minutes whenever the urge strikes me. The dough is super easy (no kneading required!) and keeps up to two weeks in the fridge, although it never lasts that long in my house. If you want to try it without buying the cookbook, check out the authors' youtube page or blog for videos with complete recipes and instructions.


Two tools that are absolutely essential for making pizza at home are a peel and a baking stone. The peel is the easiest way to transfer the dough into and out of the oven and the stone provides a hot, evenly heated surface to ensure a crispy crust. To learn more about these tools, go to youtube.com and search on "Good Eats" and "Flat is Beautiful." There are lots of clips with tips and demonstrations.

The Geek LOVES anchovies and so I brushed the dough with the oil that the anchovies were packed in. WOW! Talk about INTENSE flavor. (I do not advise this for the faint of heart.)

To finish, I layered sauce, toppings (thinly sliced onions and anchovies) and cheese and baked in a pre-heated 450F oven for 20 minutes (until the cheese was bubbly and the crust had browned).

Busy Mom Modifications
  • The "5 Minute" crust does not brown very well on its own. I brush olive oil on the outer part of the crust (the part not covered by sauce and toppings) before baking so that it will brown.
  • For the sauce, I use spaghetti sauce (HORROR OF HORRORS) because I always have a bottle on hand.
  • The cheese is whatever I have in the freezer at the moment, which for the kids is usually a combination of shredded mozzarella, monterey jack, and cheddar. But I have made pizza with brie, havarti, even goat cheese. All are yummy.
  • And then toppings: thinly sliced or julienned fruit or vegetables, sliced deli meat, canned chicken, etc. all work.
  • When it comes to layering toppings, I like to put dry ingredients directly on the sauce (under the cheese) so they will moisten as the sauce heats up. Wetter ingredients such as pineapple or tomato are better on top of the cheese so the dough does not get too wet and the vegetables dry out in the heat.
  • You may be tempted to assemble your pizza on the peel in order to save time or to keep from flouring a second surface. Resist the urge. The "5 Minute" dough is very wet and the longer it sits, the more it absorbs the surface flour. It only takes a few seconds before the dough will start sticking to the peel and then you'll have a huge mess when you try to transfer it to the oven. Assemble the pizza on a well-floured surface then transfer to the well-floured peel and transfer immediately to the hot oven. The dough should slide right off the peel with quick jerking movements.
The Results
My favorite part of this pizza is the crust. It is chewy and crusty with fantastic flavor. The Geek loved the way the intense fish flavor was infused throughout the pizza, thanks to the anchovy oil.


Ratings
  • The Geek says: This is the best pizza I've ever had!
  • Easy to make
  • Time to prepare: 30 min. if the "5 Minute" dough has already been prepared
  • Prognosis: This one's a keeper!
My Shopping List
Nothing - I used ingredients I already had in my pantry

The day's tally: $0
Total spending this week so far: $7.77

P.S.
The Geek, who jokes that he is not licensed for indoor cooking, supplied dessert: Grown-up Ice Cream Sodas. This cold and sweet treat was the perfect chaser for the salty, fishy pizza.