Tuesday, November 30, 2010

Day 11: Roast Beef à la Ron Popeil

I am a sucker for infomercials. I suppose I should be embarrassed to admit that but come on, who doesn't love a good story? The overweight, middle-aged man who magically drops 100 lbs all because he found THE magic pill! The family on the verge of bankruptcy discovers THE Internet secret that makes them millions! And how cold-hearted must you be to deny your 2-year old the headstart of reading at a 4th grade level for just three easy payments of $49.95?! Of course these claims are all true because it says so right there on the screen, "These are not paid actors" (right next to the words in much tinier print, "Results not typical").

Anyone who watched TV in the '80s will tell you that Ron Popeil, inventor and founder of Ronco, is THE ORIGINAL KING of infomercials. This is the man who first introduced us to the chop-o-matic (and subsequently the veg-o-matic and dial-o-matic), spray-on hair color for men, a way to scramble an egg while still inside the shell, and kitchen knives that cut through shoe leather. Popeil could sell a car to a blind man and thanks to the Home Shopping Network, he sold me a Showtime Rotisserie. (All together now: "Set it...and forget it!")

Kidding aside, I love my Showtime Rotisserie. You see, when I was about 8 years old, my parents decided to adopt a healthier lifestyle and became vegetarian, which meant we kids also stopped eating meat. They no longer bought, cooked or ate beef, poultry or seafood and so I never learned how to properly cook those things. (Of course being the rebel carnivore that I was, I ate meat every chance I got when my parents weren't around but that is a story for another day.) The rotisserie did everything Ron Popeil promised and for the first time, I was able to roast beef, chicken, even fish to near perfection at home.

I say "near perfection" because I used the weight or size of the meat and suggested cooking times as my guide for figuring out when it was done. Most of the time that worked pretty well but was not reliable for oddly-shaped cuts and whole birds. Then last year The Geek gave me THE must-have gadget for the carnivorous cook - a meat thermometer. Now every beef roast is a perfect 140F and I can rest assured that my rotisserie chickens have reached the required 170F for safe consumption. I've since gone on to purchase an oven timer with probe so that when I roast in the oven, I don't have to repeatedly open the oven door and stab the meat to take a reading. And recently The Geek gave me an audible timer with remote sensor so that I can monitor the temperature of food on the grill from the comfort of my sofa.

That is my long introduction to what is a very simple but elegant meal - Ribeye roast beef with a side of corn and green beans. I seasoned it liberally with kosher salt and then loaded it onto the spit. Two hours later, the kids and I enjoyed a delicious, crisply browned, perfectly medium-rare dinner.


Busy Mom Modifications and Tips
  • I never remember to take meat out of the freezer the day or two before we are going to eat it. Usually around 3 p.m. I think "What should we have for dinner tonight?" and then I pull out the first thing I find. I used to microwave frozen food to thaw it but that usually had disastrous consequences. Alton Brown recommends immersing frozen food in water to thaw it quickly. Put the meat in a zip top bag, remove as much air as possible, and then place in a container large enough so that you can fully immerse the meat. Fill the container with cool water then leave the tap on so that it drips very slowly. Thirty minutes to an hour is enough time to sufficiently thaw 2 - 3 lbs of beef or chicken.
  • I don't recommend that you do this but will share this tidbit anyway. I forgot to take the turkey out of the freezer early last week and so on Wednesday afternoon I thawed the 12 lb bird using this method in about three hours. Again, I don't recommend you rely on this method but I was desperate and no one has complained of food poisoning yet.
  • Roasting time guidelines, such as 15 min/lb for chicken, can be misleading. Those guidelines assume that the meat is starting at a specific temperature (might be room temperature, might be a refrigerator-chilled 40F) and depends on the ambient temperature. If you're like me and have forgotten to take the food out of the freezer far enough in advance, the outside might feel like it is thawed but the inside is still frozen. There have been many times I cut into a chunk of beef that was nearly burned on the outside and bloody on the inside. It is times like this that a meat thermometer is worth its weight in gold.
  • If you cook a lot of meat and don't own a meat thermometer, or if you just want to make a perfect roast, you really should get one. The fork style is the most versatile (it can be used in a rotisserie, the oven and the grill). It is also the most inconvenient since you have to stab the meat and wait for the reading every time you want to check the temperature. You lose heat and juices each time as well. When roasting in the oven, I love my Polder Oven Thermometer with probe because it truly is a "set it and forget it" device since it has both a timer as well as a temperature alarm.

The Results

Pretty much everything I make in the rotisserie turns out fabulous.

Ratings
  • From the moment the kids first smell the roast, they are eager to eat.
  • Difficulty: It takes a little know-how, but with the proper tools (a rotisserie and a meat thermometer), it is easy to make a fantastic, elegant entrée.
  • Time to prepare: Depends on the size of the roast and the starting temperature. I usually plan 40 minutes per pound and this includes prep, roasting and resting time.
  • Prognosis: This is a favorite appliance and meal
My Shopping List

Nothing - I made do with what I had on hand.

The Tally
  • The day's tally: $0
  • Total this month so far: $143

Monday, November 29, 2010

Day 10: Enjoying Mom's Cooking

I conducted my daily kid-survey to see how hungry they were - a determining factor in the amount of effort I put into making dinner - and it turns out both had snacked and neither were hungry. My plans to make (and blog) about gyro sandwiches will have to wait until tomorrow. When I only have to feed myself, I usually eat from the abundance of Korean food in the bahn chahn and kim chee fridges thanks to my parents. The kids like Korean food but only periodically so when the three of us eat together, it is usually other things.

When my mother cooks, it is no small affair. Korean food, due to its high salt content, will keep for several days so when you cook, you cook A LOT and it is a major production that lasts most of the day. When my parents make their bi-weekly trek to Koreatown (about 30 minutes away), they come home with dozens of bags full of napa cabbage and Korean radishes, giant tins of soy sauce and sesame oil, plastic bins full of chili paste and soybean paste. On kim chee days, my mom makes enough kim chee to stock a small grocery store. Kim chee ji gae (soup made from kim chee) is made by the vat-ful. And dough for bahng rises in giant plastic bowls.


Speaking of bahng... Today my mother taught a friend how to make these Korean steamed rolls that are similar to Chinese dim sum. She, herself, learned how to make these rolls a couple of years ago from a friend and has since become famous (in Korean circles) for them. As I mentioned, when she makes bahng, it is in huge quantities and it takes all day; the house is filled with the tantalizing smell of yeasty, freshly steamed bread for hours. My mom makes so many of these rolls for special occasions that last year she bought a freezer chest to store them, what we now refer to as "the bahng freezer." Lucky for me, today was a bahng day.

Dinner also came from the bahn chahn fridge. Several days ago Mom made bahn chahn to take to an elderly couple (long time family friends who made it possible for our family to emigrate to the United States in 1970) and subsequently stocked our fridge with a dozen or so plastic containers of Korean stir-fried vegetables. These vegetables - usually carrots, zucchini, bean sprouts, spinach, fiddlehead fern, and cucumbers - are specifically meant to be eaten all mixed together with Korean chili paste and a fried egg, a dish called bibim bop (loosely translated means bibim = mixed and bop = rice).

This is one of my all-time favorite dishes. During my high school years I attended a boarding school that was a four hour drive from where we lived and therefore made it home usually only one weekend a month. Whenever I got home, no matter how late it was, there would be bibim bop and homemade kim chee waiting. The ultimate comfort food for a Korean child going to school far away in rural northern Michigan.

Sorry, no recipes today. You can find lots of recipes for bibim bop on the web but personally, I find it to be very labor-intensive and time-consuming and never tastes as good as when a Korean Mom makes it. However, Korean restaurants typically do a very good job, usually for under $10. BTW, if you're vegetarian, be sure to order it without the beef.

My Shopping List

Nothing - I made do with what I had on hand.

The Tally
  • The day's tally: $0
  • Total this week so far: $143

Sunday, November 28, 2010

Day 9: Smokin' Hot Salmon

I don't go out to eat very often, mainly for budgetary reasons since feeding two teenagers and myself at a restaurant adds up very quickly. When I do go out, my one criteria for choosing a restaurant is that they have to serve something I can't make at home, which usually means we are eating at an Asian hole-in-the-wall or having In-n-Out burgers.

I haven't been out to eat since this experiment started and so I was ecstatic when The Geek offered to take me out for a sushi lunch today (and I only had to drop one hint!). We both love sushi and so it is no small affair when we go to our favorite All-You-Can-Eat sushi bar. That, combined with a late lunch hour, meant neither of us were very hungry at dinner time.

Here's where having a well-stocked pantry and a hot smokin' BFF comes in handy. The Geek hot-smokes salmon. (The smoked salmon that is typically available commercially - the thin fillets that are slimy - is made by a process known as cold smoking.) Hot-smoked salmon has the texture of cooked fish and fantastic smoky flavor. The Geek just happened to have a smoked fillet in his refrigerator along with some cream cheese and Triscuits. Voila! One of our favorite snacks!

I dug around in my freezer and found a wedge of brie and a wedge of Stilton (a mild blue cheese). I spooned some of AB's cranberry sauce (leftover from Thanksgiving) over the brie and microwaved it until just heated. The tangy cranberries and sweet honey  complemented the mild French cheese perfectly. Fuji apple slices rounded out the meal.

Busy Mom Modifications and Tips
  • I frequently make a "meal" like this on nights when we're short on time or I am not in the mood to cook. I buy a loaf of crusty Italian bread, warm up some cheese (usually brie plus another, more pungent cheese such as chevré or blue cheese), add some fruit, and a protein such as summer sausage or smoked salmon. My daughter refers to this as our "European Peasant" dinner.
  • TGI Friday's, the chain restaurant, used to serve a brie appetizer that I still like to make at home. Put a generous chunk of butter on top of the brie, sprinkle with slivered almonds, and bake in a 350F oven until the butter has melted and the cheese is soft. The melted butter is perfect for dipping fresh bread.
  • Other fruit that goes well with this meal include firm pear slices, grapes, and cantaloupe.

My Shopping List
Nothing - we made do with what was on hand.

The Tally
  • The day's tally: $0
  • Total this month so far: $143 (Thanksgiving was an expensive meal!)

Friday, November 26, 2010

Culinary Cohorts, 1: Favorite Cookbooks

I love entertaining and Thanksgiving is one of the most elaborate meals I make all year. In the flurry of cooking, setting the table, eating and cleaning up, I did not snap one picture all day. And as yummy as the leftovers are, they do not look nearly as appetizing in photos once they have been portioned into small plastic containers. Rather than blog about the meal that was (and its various reincarnations), I thought I'd occasionally write about some of my favorite cooking-related things. Today it is cookbooks.

In my mind, there are three types of cooks in the world:
  • The Creator, the innovative chef who creates cuisine and sets trends in cooking (e.g. restauranteurs, professional chefs)
  • The Comforter, a person who whips up comfort foods at a moment's notice using recipes that have been passed on by tradition and demonstration for generations (e.g. Italian mamas, Korean mother-in-laws)
  • The Copycat, a person who gets their cooking inspiration from recipes from other sources (i.e. the rest of us)
I am largely a Copycat and make no apologies for it and I have my oldest sister to thank for this. My parents are first-generation Korean and both are Comfort Cooks. As I mentioned in a previous post, I grew up eating Korean food every meal of almost every day. The few times we ate something other than Korean food at home, it was usually because my sister found a recipe somewhere and made it for us. She is the one who taught me how to properly measure a cup of flour (don't tap it on the counter), how to sift dry ingredients (we used a strainer since we didn't have a sifter), and how to read a liquid measuring cup (down at eye level). To this day, I think of her whenever I make Nestlé Tollhouse cookies.

For years I bought cookbooks simply because they had interesting titles (The White House Family Cookbook) or the pictures were pretty (Salad). I have also picked up many books for $1 at the local library's used books store (Soupcon: Recipes from Chicago's Junior League). Most of these books have found new homes on other people's shelves.

Today I have a self-imposed limit of one bookcase for cookbooks so very few new books make it on to my shelves any more, mainly because it means I have to give up something else to make room. Some recent acquisitions with which I have been very pleased include:

  • Artisan Bread in 5 Minutes a Day, by Jeffrey Hertzberg and Zoe Francois - Freshly baked bread anytime you want it
  • Japanese Hot Pots, by Tadashi Ono and Harris Salat - Fabulous one-pot meals that are as beautiful to look at as they are delicious to eat
  • Into the Vietnamese Kitchen, by Andrea Nguyen - Authentic Vietnamese flavors from ingredients you can buy in most megamarts
  • Deceptively Delicious, by Jessica Seinfeld - What mom doesn't love instructions for hiding vegetables and other nutritious ingredients in kid-favorites like chocolate chip cookies?
I have a few titles/authors that I buy as soon as they are published (including the Good Eats series from Alton Brown and Cooking Light Annual Recipes), although it is getting harder and harder to choose something to give up in their place. And there are those books that I reach for first and will always treasure, including:
And finally, there are those novelty titles that have become family favorites:
I think that's enough about cookbooks for now. The Geek is smoking salmon for tonight's dinner so I am on to visions of smoked fish and cream cheese.

Wednesday, November 24, 2010

Planning for Thanksgiving

The kids are home this week on Thanksgiving vacation and are responsible for making dinner for the next few days. Not having to cook tonight gives me time to plan for Thanksgiving Brunch.

This year we decided to limit our gathering to immediate family, which still puts us at 11 people. Several members of this group are vegetarian and my nephew is allergic to nuts so everything (except the turkey and one pecan pie) will be meat-less and nut-free.

After taking stock of the pantry, I realized I will probably spend a couple weeks' worth of grocery money on this one meal. Fortunately I have a turkey in the freezer (that has been frozen rock-solid these past 12 months). I'll outsource some of the things that are easy to buy like rolls and desserts. And having an abundance of leftovers means I will not have to cook (or shop) for several days afterward.

Our Thanksgiving menu is always essentially the same:
We have lots of cooking and cleaning to do today so I'm cutting this post short and will take tomorrow off from blogging.


Crescent and Spinach Cheese Bake

This recipe comes from America's 30th Bake-off, one of those paperback cookbooks from Pillsbury that they sell by the cash registers at grocery stores. This one is copyrighted 1982, which means I was 14 when I bought it. Some of my best recipes come from old cookbooks, and I make this casserole every Thanksgiving because it is one of my sister's favorites.

1/4 c. finely chopped onion
1/2 clove garlic, minced or 1/8 tsp. garlic powder
2 tbsp. oil
1/4 tsp. salt
1/8 - 1/4 tsp. cayenne pepper or pepper
10 oz. pkg. frozen chopped spinach, thawed & squeezed to drain
1/2 c. cooked rice
6 oz. (1 1/2 c.) Kraft shredded natural low moisture part skim Mozzarella cheese
3 tbsp. Kraft grated Parmesan cheese
2 eggs, slightly beaten
2 tbsp. milk
8 oz. can Pillsbury Refrigerated Quick Crescent Dinner rolls

Heat oven to 350 degrees. Grease 9" pie or round cake pan. In small skillet, cook onion and garlic in oil until tender. Stir in salt and pepper; remove from heat.

In medium bowl, combine spinach, rice, 1 cup of the Mozzarella cheese, Parmesan cheese, eggs and milk; stir in onion mixture.

Separate dough into 8 triangles. Place 1/3 cup spinach mixture on shortest side of each triangle. Roll up; starting at shortest side of triangle, gently wrapping dough around spinach mixture and rolling to opposite point. Place rolls point side down in prepared pan.

Bake at 350 degrees for 25 to 30 minutes. Remove from oven. Sprinkle with remaining 1/2 cup Mozzarella cheese; return to oven. Bake 5 minutes longer or until cheese is melted and rolls are golden brown.

Note: As written, this recipe makes eight small servings. I always double the recipe and bake in a 9" x 13" pan.

Tuesday, November 23, 2010

Day 5: Homemade Udon

The kids have returned home after having spent the weekend with their dad and are now on Thanksgiving break. Normally it is their job to make dinner - the one meal of the day we sit together to eat - on days they are off from school. Today however, I was catching up on some of my favorite food blogs and stumbled across the recipe for Homemade Udon on Andrea Nguyen's Viet World Kitchen blog. When I offered to take over dinner duty, my daughter quickly obliged.

I LOVE LOVE LOVE noodles, a gustatory predilection I am sure I inherited from my father. I grew up eating Korean food three meals a day, 6.66 days a week. (Saturday night dinners were eaten out at the Swedish Smorgasbord, the 1970s version of All-You-Can-Eat in the mid-west, where I grew up.) I remember him serving up giant bowls of steaming noodles floating in all kinds of korean soups and broths for lunch and dinner and frequently for breakfast too. In my memory (which my oldest sister will tell you is rarely accurate), we were just as likely to eat noodles as we were rice. Today I eat a noodle dish for lunch at least two or three times a week.

But of all the noodles in the world, fresh, thick Japanese udon is my favorite, emphasis on the word "FRESH." Once you dry, freeze or deep fry noodles (which is how most noodles for home preparation are packaged now), they lose their chewy, mouth-pleasing texture. I've noticed that even Asian "Noodle Houses," which are popping up all over Southern California these days, rarely serve truly fresh, handmade noodles.

Normally I would be intimidated by the thought of making noodles but Andrea Nguyen is one of my favorite food bloggers and her recipe and video made it look easy. I decided I had to try this at least once and am I ever glad I did! The recipe is hard to get wrong and produces the chewy, satisfying udon noodles I am used to getting only in authentic Japanese restaurants.

The one catch is that it was extremely time-consuming. I halved the recipe (used 8 ounces of flour instead of the full pound) and it still took me 30 minutes just to roll-out, cut and pull the noodles. By the time you add in the resting time (2 hours), boiling then blanching in cold water, and then actually making the broth and garnishes, you are looking at three hours minimum to prepare a meal that you will slurp down in five minutes. According to Nguyen, the quantity I made should have been four generous servings. It was barely two by our standards.

By the time the noodles were ready to eat, it was late and I did not have time to make a proper dashi (Japanese broth) from scratch. Fortunately I keep a bottle of Memmi, a soy sauce noodle soup base, on hand for just such occasions. Mix with hot or cold water according to the proportions listed on the bottle. Add finely sliced green onions and fish cakes (or thinly sliced smoked ribeye, which is what I happened to have) and voila! You have a wonderful noodle dish to rival any Japanese restaurant.


The Results
Both kids slurped down the noodles and broth almost as soon as they sat down at the table, including my daughter who said she was "too full to eat dinner tonight."

Busy Mom Modifications and Tips
  • The next weekend I have a block of time, I plan on making a big batch of noodles. This really is not feasible for busy weeknights.
  • Nguyen recommends boiling the noodles until they float to the top and are chewy, about three minutes. I found that this was not nearly long enough, especially if you plan on serving the noodles cold. The noodles may seem like the perfect texture just out of the hot water bath but when you dunk them in cold water, they harden a bit. This is not a problem if you are serving them in a hot soup where they will have time to soften up again, but it is too chewy for cold preparations. For cold soups, boil the noodles until they are quite soft (but not falling apart), about five to six minutes, and then blanch in cold water.
  • I boiled the noodles in the Memmi broth a little longer than I had planned (I got distracted) but it turned out just fine. The noodles absorbed the broth and resulted in fantastic flavor.
  • I am seriously considering buying a pasta maker in the hopes it will speed up the process thereby making this meal more accessible.
  • When I am in the kitchen, my father will frequently peer over my shoulder and ask what I am cooking. Today he recognized the dough immediately. When I confirmed that I was making "kalgoogsoo" (the Korean name for udon), he suggested that next time I should add a little fresh soybean flour to the dough. "It will make it taste MUCH better!" He's the expert so I think I will take his advice!
Ratings
  • FKP*: "These noodles are just the way I like them! They are REALLY GOOD!"
  • Difficulty: Medium. The recipe calls for a food processor and kneading very stiff dough for five minutes. Otherwise it would be easy.
  • Time to prepare: 3 hours from start to eating.
  • Prognosis:  This is definitely a keeper, something I will make on on weekends and special occasions.
My Shopping List

Nothing - I made do with what I had on hand.

The Tally
  • The day's tally: $0
  • Total this week so far: $7.77
*FKP: Finicky Kid Pronouncement, which would be utterances from my teenage son.

Monday, November 22, 2010

Day 4: Ssssssmokin!

There is something you should know about The Geek: he is a smoker. Not of cigarettes but of hickory, alder, oak and pecan. He smokes seafood, pork, chicken, and beef all to delectable ends and keeps my freezer chocked full of smoked salmon and other smoky delights. It has been raining the last few days so when the sun peeked out this afternoon, The Geek decided to smoke a rib eye roast.

Smoking is all about numbers: The size of the roast, time to cook per pound, the internal temperature, the ambient temperature, the temperature at which the meat is fully cooked but not overly done. Since he is a math wiz, The Geek has smoking down to a science.  The roast came out of the smoker promptly at 5:30 and was a perfect 141F. The combination of oak and pecan gave it a beautiful mahogany color, a heavenly scent and fantastic flavor.


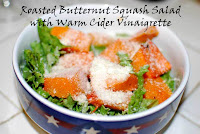
When The Geek smokes the entrée, I make the fixin's. Due to time constraints, it is usually a simple chopped vegetable salad with a loaf of bread from the bakery but on the weekends, I like to try more elaborate dishes. Today I chose one of my favorites, Alton Brown's Roasted Edamame Salad. I also had a butternut squash that needed to be eaten up so I decided to try Ina Garten's Roasted Butternut Squash Salad with Warm Cider Vinaigrette.

I'll start with the Roasted Butternut Squash Salad. Peeling and cutting up the squash was a huge effort. Roasting it took a lot longer than the 20 minutes listed in the recipe and the resulting texture was not suited for a salad, in my opinion. The vinaigrette took closer to 20 minutes (more than twice the time listed) to reduce. And unfortunately I did not have many of the key ingredients called for in the recipe. I replaced the arugula with leaf lettuce, pear cider (the carbonated kind) for the apple juice, and left out the cranberries and walnuts since I did not have comparable replacements. Perhaps this is why the salad turned out to be such a bland mess? Even if it had turned out as delicious as the reviewers on the website had raved, I'm not sure I would make this again - it was just way too much effort.

Alton, or 'AB' as we his devotees call him, never lets me down. I follow his Roasted Edamame recipe to the letter, with two exceptions. First I use frozen corn that has been thawed. And second, I like to roast the soybeans and corn until they are shriveled down to wrinkled, brown shadows of their fomer selves. I realize this does not sound at all appetizing but the beans and corn take on a chewy texture and the flavor really concentrates down. The catch is that it takes almost an hour of roasting time at 450F to achieve this effect but it is well worth it.

Busy Mom Modifications
  • The substitutions in the Squash salad were probably to the salad's detriment. If I make this again (which is not likely), I will invest in the recommended ingredients.
  • I'm not sure why The Barefoot Contessa has you peel and cut up the squash before roasting. I suspect the idea is that you can coat the pieces of squash before roasting and that somehow improves the flavor. In the past when I have roasted squash, I quarter it, scoop out the seeds and fiber, and slather the exposed surfaces with the maple syrup/butter/brown sugar/whatever and it has always been delicious. And you have the bonus of being able to easily scoop the flesh out of the skin. If you're going to try this recipe, you may want to quarter instead of chopping up/peeling the raw squash.
  • AB has you cutting the corn fresh off the cob. I use frozen corn that has been thawed.
  • The Edamame salad is quick and easy, and if you roast for the recommended 10 minutes, this is very do-able for a weeknight dinner.
  • Line the baking sheet with aluminum foil before putting in the beans and corn. This will make it easier to transfer to the serving bowl (lift off the foil and pour into the bowl) and simplifies clean-up.  

The Results

  • Of course the roast was the star of the meal. If you don't have a friend with mad smoking skills, then you should go out and find one.
  • I've said enough about the squash salad.
  • The edamame salad is always a hit.

Ratings for the Edamame Salad
  • From The Geek: "Wow! This salad has a lot more flavor than you would think it would have from looking at it. It is really good." 
  • Difficulty: Easy.
  • Time to prepare:  20 minutes up to 1 hr 10 minutes, depending on how long you roast the soybeans and corn and assuming you use frozen corn
  • Prognosis:  A favorite that I love to serve to guests

My Shopping List

Nothing - I made do with what I had on hand.

The Tally

The day's tally: $0
Total this week so far: $7.77

Sunday, November 21, 2010

Day 3: Enjoying the Bounties of Someone Else's Pantry

Today I was invited to join some friends for a chili dinner.  When the cook heard about my blog, he laughed and said that that was how he decided what to put in the pot. He scrounged around in his refrigerator and pantry and added the things that needed to be used up. The end result was a delicious turkey chili loaded with beans and vegetables.

My contribution to dinner was Double-Corn Cornbread, a recipe from one of my favorite cooking sites, http://www.cookscountry.com/.  

The recipe calls for 1 cup of sour cream and I was out. Since it was raining and I wasn't in the mood to go to the grocery store (what can I say, I live in Southern California!), I decided to make-do with what I could find in my fridge. I will frequently use yogurt as a substitute for sour cream in cooking but was out of that too. So I combined half a cup of mayonnaise with half a cup of cream cheese. While not quite as sour as sour cream, the texture and fat content was about equivalent and seemed to work out just fine.

To round out the meal, The Geek made bananas flambé, a delicious concoction of sugar, butter, three types of alcohol, and lemon and orange zest  and juice reduced to a tangy, flavorful sauce in which bananas are then simmered. For a guy who is "not licensed to cook indoors," he knows how to finish out a meal.

Busy Mom Modifications and Tips
  • As I mentioned above, I substituted 1/2 cup Mayo + 1/2 c cream cheese for the sour cream.
  • I was running late for dinner and so I decided to take a shower while the cornbread was baking. Unfortunately, the bread over-baked in the fifteen minutes I was away. (The recipe lists 25 minutes as the baking time.) You'll definitely want to keep an eye on this the first few times you make it.
  • The cornbread turned out a bit dry and crumbly. While it could have been because I baked it too long, I suspect I also stirred it too much. Cornbread is a "quick bread" and like muffin batter, should only be mixed until the ingredients are just combined.This recipe calls for two rounds of stirring. Next time I will fold in the wet ingredients until they are just barely mixed and then swirl in (as opposed to mixing in) the melted butter.

The Results

Depending on where you live, cornbread recipes tend to be sweet or savory. This recipe falls right in the middle - just a hint of sweetness while being hearty. Dryness aside, the flavor of the cornbread was delicious. Very flavorful and "corn-y." The dry, crumbly texture worked to our advantage when we crumbled it into the chili.

Ratings
  • Crowd Comments: Everyone said the cornbread was good, that it went well with the chili
  • I rate this medium difficulty because it requires a practiced eye for determining when you have mixed enough and it is easy to over-bake. The recipe also calls for a food processor.
  • Time to prepare: 35 minutes plus 20 minutes of cooling time.
  • Prognosis: Not sure it's worth the effort; will give it one more try

My Shopping List

Nothing - I made do with what I had on hand.

The Tally

The day's tally: $0
Total this week so far: $7.77

Saturday, November 20, 2010

Day 2: Pizza and The Geek

The kids are with their dad this weekend and so I am having dinner with one of my BFFs tonight, a person I affectionately refer to as "The Geek" due to his expertise in computer programming and internet security. It's a gastronomic symbiosis - I love to cook and he loves to eat. One of our favorite meals is pizza with anchovies and since I exceeded my daily shopping limit yesterday by $2.77, I decided this was a good meal for today since I had all the ingredients in my pantry.

I recently bought the cookbook, Artisan Bread in Five Minutes A Day and I think the recipes result in some of the best bread I have ever tasted. A little flour, warm water, salt and yeast is all it takes. I always keep some dough in my refrigerator so that I can have homemade pizza (or calzone) in 20 minutes whenever the urge strikes me. The dough is super easy (no kneading required!) and keeps up to two weeks in the fridge, although it never lasts that long in my house. If you want to try it without buying the cookbook, check out the authors' youtube page or blog for videos with complete recipes and instructions.


Two tools that are absolutely essential for making pizza at home are a peel and a baking stone. The peel is the easiest way to transfer the dough into and out of the oven and the stone provides a hot, evenly heated surface to ensure a crispy crust. To learn more about these tools, go to youtube.com and search on "Good Eats" and "Flat is Beautiful." There are lots of clips with tips and demonstrations.

The Geek LOVES anchovies and so I brushed the dough with the oil that the anchovies were packed in. WOW! Talk about INTENSE flavor. (I do not advise this for the faint of heart.)

To finish, I layered sauce, toppings (thinly sliced onions and anchovies) and cheese and baked in a pre-heated 450F oven for 20 minutes (until the cheese was bubbly and the crust had browned).

Busy Mom Modifications
  • The "5 Minute" crust does not brown very well on its own. I brush olive oil on the outer part of the crust (the part not covered by sauce and toppings) before baking so that it will brown.
  • For the sauce, I use spaghetti sauce (HORROR OF HORRORS) because I always have a bottle on hand.
  • The cheese is whatever I have in the freezer at the moment, which for the kids is usually a combination of shredded mozzarella, monterey jack, and cheddar. But I have made pizza with brie, havarti, even goat cheese. All are yummy.
  • And then toppings: thinly sliced or julienned fruit or vegetables, sliced deli meat, canned chicken, etc. all work.
  • When it comes to layering toppings, I like to put dry ingredients directly on the sauce (under the cheese) so they will moisten as the sauce heats up. Wetter ingredients such as pineapple or tomato are better on top of the cheese so the dough does not get too wet and the vegetables dry out in the heat.
  • You may be tempted to assemble your pizza on the peel in order to save time or to keep from flouring a second surface. Resist the urge. The "5 Minute" dough is very wet and the longer it sits, the more it absorbs the surface flour. It only takes a few seconds before the dough will start sticking to the peel and then you'll have a huge mess when you try to transfer it to the oven. Assemble the pizza on a well-floured surface then transfer to the well-floured peel and transfer immediately to the hot oven. The dough should slide right off the peel with quick jerking movements.
The Results
My favorite part of this pizza is the crust. It is chewy and crusty with fantastic flavor. The Geek loved the way the intense fish flavor was infused throughout the pizza, thanks to the anchovy oil.


Ratings
  • The Geek says: This is the best pizza I've ever had!
  • Easy to make
  • Time to prepare: 30 min. if the "5 Minute" dough has already been prepared
  • Prognosis: This one's a keeper!
My Shopping List
Nothing - I used ingredients I already had in my pantry

The day's tally: $0
Total spending this week so far: $7.77

P.S.
The Geek, who jokes that he is not licensed for indoor cooking, supplied dessert: Grown-up Ice Cream Sodas. This cold and sweet treat was the perfect chaser for the salty, fishy pizza.

Friday, November 19, 2010

Day 1: Chicken Wings from Alton Brown

I love chicken wings and I love Alton Brown. So when I saw the episode of Good Eats, "The Wing and I," a few weeks ago, and then found frozen chicken wings at Costco, I knew I would be making them soon.

I decided that this would be a good dish for my first day of pantry shopping. In looking at the recipes for Buffalo wings and Orange Glazed Wings, I saw that I had just about everything I needed. I bought a can of frozen orange juice concentrate, of which I used half. I'm allowed to buy fresh fruits and vegetables as needed in this experiment and celery seemed like a good accompaniment. Of course this meant I had to buy blue cheese dressing. Since salad dressing is a "staple," it is an allowable purchase. A loaf of La Brea Bakery French bread rounded out the meal.

Chicken wings are usually deep fried which really adds to their already high fat content. I like AB's recipes because the wings are steamed (which allows much of the fat to drip off) and then roasted in a 425F oven so that the skin gets crispy. But the caveat is that these recipes, while easy to make, require two hours to prepare if you follow the recipes as written.

Busy Mom Modifications
  • I forgot to take the wings out of the freezer to thaw (as frequently happens!) and so I steamed the wings for 20 minutes instead of the 10 minutes in the recipe.
  • I didn't refrigerate after steaming because I didn't have time. Refrigeration dries out the skin so that it will crisp up more readily in the oven. I dried the wings thoroughly with paper towels before sticking them in and they turned out just fine.
The Results
Both kids devoured the wings. My son, who has very low tolerance for spicy foods, pointed out that the buffalo wings were not spicy at all. The buffalo glaze was quite thin and just ran off the wings. We found that if you let them sit, the butter would thicken a bit as it cooled and that helped it stick. But maximum flavor was achieved by rolling the wing around in the buffalo sauce just before eating.


Ratings
  • FKP*: Delicious!
  • Easy to make
  • Time to prepare: 70 min., if you do not refrigerate the wings after steaming
  • Prognosis: This one's a keeper!
My Shopping List
  • Orange juice concentrate: $2.29
  • Celery $0.99
  • Bleu Cheese Dressing $2.50
  • La Brea Bakery French bread $1.99
The Tally

The day's tally: $7.77
Total this week so far: $7.77

*FKP: Finicky Kid Pronouncement, which would be utterances from my teenage son.

Thursday, November 18, 2010

The Experiment Begins!

My mother told me the other day that she could not close the freezer door because I had too much food in it. Mind you, she was talking about the full-size, standalone freezer that we keep in the garage.

We are a house of five people (me, my parents, and my two teenage kids who live here half time) and yet we have FOUR full size refrigerators/freezers and numerous other smaller refrigeration devices scattered throughout the house.

Which begs the question... Why on earth do we have so many refrigerators/freezers? And more importantly, (my kids want to know) why is there so much food around and yet never anything to eat?

There are many explanations for this.


1. We are a first-generation Korean family. This is self-explanatory to anybody who is Korean or knows a first-generation Korean family. Korean food is loaded with garlic and oftentimes other smelly ingredients like fermented cabbage and salty seafood. No matter how tightly you seal up the container, the smell will seep through the impenetrable container and the walls of the refrigerator and result in funny tasting ice cubes. (According to my mother, this is a serious problem.) So we have a bahn-chahn (Korean side dish) refrigerator that is strategically located near the kitchen table. We also have a Kim chee refrigerator (which also houses giant bags of onions, green onions, and other smelly vegetables) in the garage.

2. I love to cook and not just one or two things. I love to try recipes from every culture, genre, and course. And you never know what mood will strike when so my pantry stocks ingredients from many countries. For example, noodles. Right now I have Italian spaghetti, Korean gook soo, Japanese soba, Thai rice noodles, not to mention macaroni, rice paper, and a few gluten-free, noodle-like items on my shelves.

3. I'm a bit of a shopaholic and hoarder. I hate running out of stuff and can't resist a good sale. Especially if it's at Costco. Hence I have giant jars of nutella, huge bags of ravioli (spinach AND the three-cheese kind), stacks and stacks of paper plates and other partyware. And I inherited these tendencies from my parents so there are a half dozen rice cookers in my garage along with 50 lb sacks of rice among other things.

4. I'm also a single mom who works full time, tries to keep pace with two active teenagers, and maintain a home and a social life. My love of cooking often gets pushed aside for fast food and packaged meals. And so the food accumulates.

And so I begin my grand experiment. For the next 44 days (from now until the end of the year), I am going to "shop" from and cook with the food currently in my refrigerators/pantry/garage. I'm still working on the rules for this experiment but the goal is to cut my food spending by 75% between now and January 1, 2011. This means I have to limit my grocery shopping (and eating out) to less than $40 a week and a monthly limit of $150. And less is better.

Today is day 1.